Audacity 3 (https://www.audacityteam.org)
Feel free to pick and choose from the general tips on editing mp3 files for a podcast below:
For sound engineering, I encourage you to record and post-edit your recording using the latest version of Audacity.
Post-editing a recording enables you to tidy things up. Cutting gaps, reducing the 'emms and ahhs', remove filler speech, background noises and any generally unnecessary audio. Audacity also lets you to record directly to the project if needed for voice over and bookend statements.
You can also post-process the recording to try to improve its quality; applying effects such as normalize (e.g. default values, typical -2.5dB) and compressor (default values), noise reduction, to fade in / fade out edits and eventually, and then ultimately, export the finished project to a new mp3 file.
 |
| A screen shot of an Audacity project |
The screenshot above illustrates what waveform levels might look like for your recording. Above all else trust your ears to judge the quality of a recording when you listen back to it.
Editing Audio for Podcasting with Audacity
Save Save Save - the Project file and folder
Everything lives in .aup3.
You are strongly advised NOT to save your active project to an external USB stick/disk, networked storage or cloud storage as it is unlikely to be fast enough for satisfactory recording and editing.
To avoid data loss save the project frequently. Make a local disk copy for project editing as Audacity generates very large sets of project edit/state files (online cloud drive services may not unpack or stage quickly enough to support Audacity's project edit/save cycle).
To share an Audacity project with others you will need to share the project aup3 file.
To share an Audacity project with others you will need to share the project aup3 file.
n.b. older versions of Audacity stored data in a project _data folder. If you move to Audacity 3 there will no longer be a _data folder for each project (yay).
And save save save save frequently.
And occasionally 'save' then 'close' the project window to force the project to compact safely.
Reopen and continue working.
Importing audio
Create a new project and save to disk.
File > Save Project > Save Project (cmd S)
Import previously recorded audio (an mp3 or wav file).
File > Import > Audio
Save
cmd S
Your Audacity project with at least one audio track will resemble the screen shot above.
You can play, pause and even record new audio to the current track.
The playhead is the vertical line displayed over the waveform. All tracks will play through the audio device unless muted or one is soloed. The keyboard space bar toggles the play/pause function from the current playhead.
Once you start importing audio (particularly high quality poly WAV recordings), the Audacity project file (as of version 3 this will be the *.aup3 file) can become very large very quickly (anywhere from 3 GB to 36 GB).
I'm not 100% sure how to keep project size manageable (up to 2 or 3 GB seems about right) but have been experimenting with setting the project quality preferences, changing the default sample format from 32-bit float to 16-bit. Audacity may still spend 10s of minutes compacting the project when you close or quit.

Quick select, cut and paste
 |
| The Audacity toolbars, click and drag to rearrange or float |
Choose the Selection Tool (F1) to edit your audio track directly. Click-drag to highlight parts of the audio waveform. Use the cursor to select the waveform to copy (cmd C), paste (cmd V), duplicate (cmd D) cut (cmd X) or delete (del, backspace or cmd K) along the timeline. The edit commands are also accessed via the menu.
Edit > etc.
Automatically suppress background and soft sounds like breathing
Use Label Sounds to automatically search for and label silence (Audacity manual)


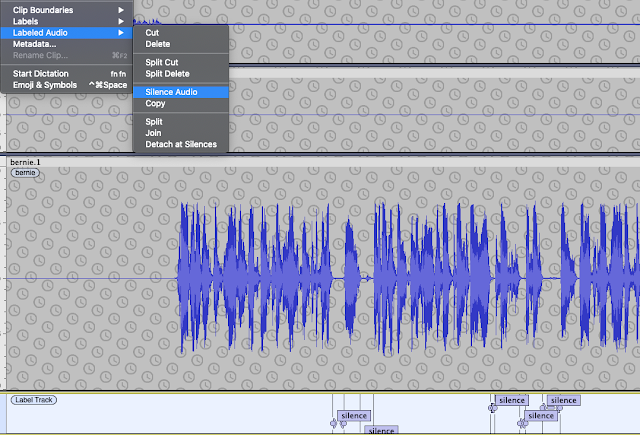 |
| Select Silence and suppress e.g. Silence Audio or manually e.g. Select and Normalize -35dB |
Using Tracks
Import a second audio file (for example, our intro/outro music).
Save the project (you should save frequently).
You will see at least two tracks in the current Audacity window.
Toggle the Sync-Lock Tracks setting if you want multiple tracks to overlay each other. This is useful if for example you want to overlap and slowly fade out an intro jingle.
Tracks > Sync-Lock Tracks (on/off)
You can organise the structure of a recording by using new tracks for sections of audio (to organise the large scale edit).
As of Audacity 3 you can now grab the track label bar when the hand icon/tool appears. This is a really handy :-) approach for aligning track segments or to move a split selection from one track to another.
Large scale edit
Your listeners want a well edited informative podcast so remember, less is more. You will have to listen (and re-listen) to your material and decide what to keep or delete. Think about the length and structure of the recording. You can change the order. You will delete stuff so do it. Concentrate on large chunks, the structure of the talk. Don’t worry about breathing, coughs and minor noises just yet.
Auto-Duck workflow...
Use noise-reduction on a scratch-track then auto-duck then auto-duck inverse in sequence to selectively reduce breath noise, background noise and artefacts on your working track (a good explanation video at this link).
1. duplicate the audio track to a new scratch track and apply noise reduction several times to the scratch track only...
2. create a new control track ABOVE the scratch track and generate a tone in this track: Sine, 120 Hz, 0.2 amplitude.
3. Auto Duck is applied "top to bottom". Select the track to be "Ducked" with the track below it having the "Auto Duck" pattern. Then apply Effect > Auto Duck (or Effect > Volume and Compression > Auto Duck), using the settings illustrated below...

4. Do this again but applying the new settings illustrated below...

Small scale edit
After the large scale edit more or less done, spend time on the small scale edit. This involves zooming in and fine-grained cut and pasting. But think before acting, is it really necessary to remove every single intake of breath?
For example: cut long gaps, background noises and any generally unnecessary audio. You might also cut some of the egregious 'emms and ahhs' and nervous filler speech we all use. A caution though, the small scale edit can become a journey without an end, or at least a very long journey.
Note: "Sometimes you will not want to close the gap and yet still remove the noise, for instance if somebody breathes loudly. For such occasions copy a section of audio during which nobody is speaking (e.g. at the start of the recording) and paste it over the unwanted noise. This will preserve the natural pacing of speech." (source: Cook & Holdis, CEU Podcast Library - link)
Fade-in Fade-out
Apply fade-in and fade-out when you want the speech to start or end smoothly.
 |
| A useful Audacity EQ setting |
Post-processing - Loudness Normalization
Start out by applying loudness normalization (default -23 LUFS) separately to each track - why separately? Each track has its own average. I think normalising across all tracks at the same time biases the average gain to the loudest track's level. The same thing happens with Normalize but you can use that to your advantage to selectively boost or reduce selected loud or quiet segments.
Post-processing - noise reduction (if needed)
Select a several second sample of just the noise you want to remove.
Post-processing - low pass / high pass and other ways to reduce echo?
What to do if the original recording has transient audio peaks (annoying clicks, chirps, squeaks etc)?
Different approaches available depending on the original capture...
...via EQ
Apply the low pass filter at as low a cut-off level as you can get away with e.g. 1,100 Hz, 12 dB roll-off
Then apply click removal (200/40)
...via EQ again
Another alternative is to apply the RIAA filter using the Filter Curve EQ effect. This shifts the vocal emphasis towards the bass without over-muffling the sound. Reducing the intensity of the higher frequencies allows the listener to focus on the mid-low vocal range and deemphasises the intensity of any annoying high-end audio reflection that gets captured so easily when using a condensor mic in a room without sound treatment.
Then EQ->Normalize->Compressor->Normalize (can repeat if needed) as follows...
1. Post-processing - Graphic EQ (equalization)
Base boost plust treble boost
2. Post-processing - Normalize
Apply default (-3dB) - the waveform will push over 0.5 but keep away from 1.0
3. Post-processing - Compressor (last)
Select -19 dB or choose a threshold between default -12dB down to as low as -30dB
Select noise floor, around -50dB
Select ratio 4.7:1 or vary, typical ratio, between 2:1 - 3:1 - 5:1
Drop attack time (0.2s) and release time (2.0s) to maximise compression applied
These settings end up boosting the volume (visually the waveform moves closer to 1.0) making it too loud and noisy so you'll need to normalize (or amplify) again...
4. Post-processing - Normalize (again)
Apply default (-3dB) or you can apply Amplify -3dB, for the same result.
The desired result being for the waveform peaks to re-balance back to around the 0.5 level.
Installing the De-Esser and De-Clicker Nyquist Plugins...
Apply De-Esser and De-Clicker if needed
Improving a Zoom track?
Loudness Normalization > AUMatrixReverb > ClipFix > Normalize 3 > Amplify 3
Apply Noise Reduction if a suitable noise sample is available
Overall, peak levels to be no more than 3dB
 |
| AUMatrixReverb settings may help to obscure small room reverb |
 |
| AUBandpass Filter |
Finish up
Export the mp3
Finally, create the finished product, by exporting to an mp3 file.
> File > Export > Export as MP3
This mixes all tracks in the Audacity project down to a single track.
Use settings similar to the following to export your audio file.


Quality checks:
- Is the intro/outro music at a suitable level?
- Does the intro/outro transition smoothly to/from the spoken audio?
- Is the spoken audio at a suitable level? (i.e. no clipping, waveform amplitude averages around 0.5 on linear scale)
- Is the speed of speech natural?
- Large scale edit - remove fumbled speech, removed confidential disclosures, cut out a duplicate or passages that were off topic, etc.
- Small scale edit - remove ticks, emms, ahhs, sighs, distracting background, etc.
- You wouldn't normally have backing music running throughout a podcast, but in some cases, for example, background room noises leaking into the audio, so you may decide to use low volume background as a filler/distractor.
Useful links
An Audacity tutorial on mixing a narration with background music
https://manual.audacityteam.org/man/tutorial_mixing_a_narration_with_background_music.html
https://manual.audacityteam.org/man/tutorial_mixing_a_narration_with_background_music.html
Refer to the Audacity manual online (e.g. the track panel description/explanation is at manual.audacityteam.org)
An Audacity user's simple tutorial and workflow activities:
Using the Compressor in Audacity
Using Noise Removal in Audacity
On including music from other artists (for atmosphere, decoratively, for intros/outros & transitions)
In the first instance, if you know the artist ask for their permission to use their material. You may be pleasantly surprised by the positive cycle of recognition and community surrounding artist works. Make sure you acknowledge them in your show notes.
We recommend releasing under the “Attribution-NonCommercial-ShareAlike version 4.0 creative commons licence (aka CC BY-NC-SA 4.0). You can choose from a number or variations of the CC licence; CC BY, CC BY-NC, CC SA etc.
These licences can be viewed at https://creativecommons.org/licenses/by-nc-sa/4.0
Always check the royalty free claims of audio samples found online. If you want to find audio from online sources, search for CC BY titles on Soundcloud or on YouTube
The link to the YouTube channel "Of Musicians" below is a collection of a selection of royalty free original music.
Record the following information in your show notes to establish the provenance and bona fides of 3rd party music, artwork and creative content that you decide to use:
Music (CC BY-NC-SA licence)
Title: “a title”Artist: “a name”Source: “a link to the original”Licence: “CC BY-NC-SA”
Cover Art (CC BY-NC-SA licence)
Title: “a title”Artist: “a name”Source: “a link to the original”Licence: “CC BY-NC-SA”
Example workflows:
Note, don't just apply these without testing. The basic method is to select a 10s sample and preview effects/filters until you are happy with the sound.
Simple standard process
Align tracks
Per-track noise reduction
Isolate voices
De-clicker (default) on all tracks (process run-time is typically the full track duration e.g. 15-30+ minutes)
De-esser (default) on all tracks (process run-time is a small fraction of the track duration)
Loudness Normalization (-23dB LUFS)
Compressor (default)
Makeup soft and suppress clipping on small edits with Normalize.
For an original track that had a pronounced small 'room' sound and a tendency to 'clipping zone' raw i.e. the waveform looks high, square and flat.
Align and isolate
De-clicker (default) on all tracks (process run-time is typically the full track duration e.g. 15-30+ minutes)
De-esser (default) on all tracks (process run-time is a small fraction of the track duration)
Loudness Normalization (-23dB LUFS)
Compressor (default)
Loudness Normalization (-23dB LUFS) (again)
Makeup soft and suppress clipping on small edits with Normalize.
AUMultiBandCompressor on affected track (the Sub Control preset sounded nice)
Normalize all audio to push up/down to average 0.5 waveform view (to give a typical -12dB to -6dB range with -3dB peaks)
For a track with clicks and speech that sounds very wet.
De-clicker (non-default 2 pass or more) on wet track.
Isolating second voice when two mics in the same room
Switch to Spectrogram view and select vocal patches with "Spectral edit multi tool" to fade-edit cross-talk.
AUMultiBandCompressor on affected track (the Sub Control preset sounds nice)
For a track with small room reverb and 'tinny' mic
Switch to Spectrogram view and select low frequencies 1-300Hz with "Spectral edit multi tool" to fade-edit.
Apply Filter Curve EQ - apply 100Hz Rumble filter to remove 'rumble pressure' from the audio (it feels like pressing on your ears when listening with headphones).
Apply Filter Curve EQ - apply Radio filter to remove the sensation of light 'highs' pressure when listening to the audio.
