Monday, 3 October 2022
Good UI delivers visibility, feedback, control.
Golden Krishna's thoughts on 'NO UI' prompted a response by his colleague at Cooper Design, Stefan Klocek, who argued back that good UI can be, should be, is desirable. Design should not be about removing UI, but that good UI is instead about those three big things that Don Norman focuses on: visibility, feedback, control.
Klocek's article is available from The Cooper Journal (link)

The best interface is no interface
Who doesn’t want Twitter inside the refrigerator?
I'm sorry, Twitter in my refrigerator, why?
“Upgrade your life” with a better refrigerator door from Samsung and check Tweets when getting some water from the fridge??
How do you make a better hotel lobby? Slap an interface in it. A giant touchscreen with news and weather is exactly what’s missing from my hotel stay?!??
Golden Krishna argues that our love for the digital interface has gotten out-of-control. With more than a touch of irony...
"Creative minds in technology should focus on solving problems. Not just make interfaces."From The Cooper Journal (link)
Thursday, 29 September 2022
Avalanche Rescue? There's NOT an app for that...
How to survive an avalanche? Don't get into one.
Interview with Jill Fredston
(Eptstein, 2021)
 |
| Illustration by Slate Magazine 2021 |
Out of bounds (an article from ABC News, Australia (2021 link))
Avalanches? In Australia? They are real and they can be deadly. But a group of back-country adventurers is trying to keep skiers, boarders and bushwalkers safe when they head out into the alpine wilderness.
The Canadian Avalanche Centre "Avalanche Canada" gear recommendation: https://www.avalanche.ca/gear
The BCA Tracker2 Avalanche Transceiver on epictv.com
Galileo-LawinenFon turns a smartphone into an avalanche transceiver (2014 link).
On misguided attempts to replace avalanche rescue beacons with one of a growing number of smartphone apps (2013, link).
The BCA Tracker2 Avalanche Transceiver on epictv.com
"The Tracker2 avalanche transceiver is used to quickly locate avalanche victims and is required equipment for ski touring and backcountry skiing. The Tracker 2 is one of the fastest and most precise pinpointing transceivers on the market. It features triple receive antenna, instantaneous real-time display, and the same easy-to-use interface as the Tracker DTS. A mechanical search/transmit switch is super intuitive making it easy to use right “out of the box.” Includes multiple burial indicator lights and Special Mode.
Galileo-LawinenFon turns a smartphone into an avalanche transceiver (2014 link).
"(in 2013...) the Canadian Avalanche Centre (CAC) issued a warning about the dangers of relying on smartphone apps that were being marketed as economical alternatives to avalanche transceivers. But a new smartphone app and add-on hardware component could provide an alternative that is not only cheaper than dedicated avalanche transceivers, but also provides additional functionality.
On misguided attempts to replace avalanche rescue beacons with one of a growing number of smartphone apps (2013, link).
"Some people may be tempted to save a couple hundred dollars on an avalanche beacon and opt for one of several apps on the market. The Canadian Avalanche Centre does not recommend using these apps for actual avalanche incidents, however. It assessed three European apps – iSis Intelligent (Mountain) Rescue System, Snøg Avalanche Buddy and SnoWhere – before coming to the conclusion that they are unreliable and promote a false sense of security.
Avalanche airbags now offer wireless remote activation (2010, link).
"ABS has introduced a world-first - a remote, networked electronic system which allows airbag inflation to be triggered by other members of a skiing party, allowing them to help each other in an emergency.
This tracking system promises faster help for avalanche victims (2007, link).
"A new positioning system which will use Galileo, the future European global positioning satellite system, may prove to be a life saver for avalanche victims.
The Avalanche case
Similar case: 6 skiers survive backcountry avalanche near Whistler: Report by CBC (link).
From Bill Buxton's "Sketching User Experiences" (Buxton, 2007).
This case sets up the issues for high-tech design, design that works 'in the wild', that works for real people in real situations and facilitates achieving their human goals.
Bill Buxton sets the scene with the avalanche responder case. It is an incident experienced by his good friend Saul Greenberg, Saul's wife, and three friends when skiing in high mountainous terrain in Canmore and Kananaskis Country, Alberta, Canada.
The group was traversing a valley slope when a lethal avalanche fell across their path. The three skiers in the middle of the group were caught in the slide. The lead (Saul's wife) and the last skier could only watch the disaster unfold as three of the following skiers were engulfed by the avalanche. One was simply knocked down, one was buried up to her shoulders, and the last, Saul, was missing.
From Bill Buxton's "Sketching User Experiences" (Buxton, 2007).
This case sets up the issues for high-tech design, design that works 'in the wild', that works for real people in real situations and facilitates achieving their human goals.
Bill Buxton sets the scene with the avalanche responder case. It is an incident experienced by his good friend Saul Greenberg, Saul's wife, and three friends when skiing in high mountainous terrain in Canmore and Kananaskis Country, Alberta, Canada.
The group was traversing a valley slope when a lethal avalanche fell across their path. The three skiers in the middle of the group were caught in the slide. The lead (Saul's wife) and the last skier could only watch the disaster unfold as three of the following skiers were engulfed by the avalanche. One was simply knocked down, one was buried up to her shoulders, and the last, Saul, was missing.
Let's pause the story at this point.
What is the normal procedure when backwoods skiing where there is a risk of avalanches?
 |
| Avalanche and path of ski group collide |
First, you go equiped with specialised equipment: radio transceivers, probes, and collapsible shovels. But more than just the technology; it requires know-how, knowledge, practices, shared practices, skills, situational analysis, stuff you learn and some stuff you have to make up as you go.
When skiing across an avalanche risk slope or area, you work one of a number of simple systems depending on the severity of the risk. Normal procedure for traversal is to spread out and post lookouts at either end, and traverse one-by-one. If a group gets caught in a slide and some survive (most don't) what do you do?
Question: After the 'who'; what saved Saul?
Instructional videos by Canadian Forest Rescue SEE SAFETY (http://www.fsavalanche.org/).
Design related material:
Source: Buxton, B. (2007) Sketching User Experiences: Getting the Design Right and the Right Design, San Francisco, Morgan Kaufmann. (Video examples for the book can be found at the publisher's companion site)
Bill's homepage (billbuxton.com)
When skiing across an avalanche risk slope or area, you work one of a number of simple systems depending on the severity of the risk. Normal procedure for traversal is to spread out and post lookouts at either end, and traverse one-by-one. If a group gets caught in a slide and some survive (most don't) what do you do?
- Someone goes lookout (you may be hit by another avalanche).
- Reverse triage; rescue the most able first (and they may be able to assist later).
- Rescuers go to the approximate location of buried victims, judge if carried onwards, then guide using transceiver.
- Use an avalanche probe to locate the body.
- When the victim is felt you start to dig and dig.
The story continues...
"Steve, who was higher, checked up on Shane (who was okay), then immediately went to his wife. He freed her arms, and made sure her head was above the snow."
"Judy went directly to the spot where she had last seen Saul... In order to pinpoint Saul's location, Judy used her avalanche transceiver. ... Using this, she walked a particular pattern on the snow, employing the loudness of a ping (determined by the strength of a signal from Saul's transceiver) to guide her closer and closer to a spot above where he was buried."
"Judy started digging. Steve arrived and asked if she had verified the spot with her probe, she hadn’t. Judy was confident that she had the right spot, but by this time she had had to dig so deep that her confidence was wavering…"
Saul had tried to ski his way out of it but got caught in the hollow (avalanches can travel at up to 200km/hr whereas 40km/hr is really fast for a skier).
Saul got caught in the trough, a ‘feature trap’, that also meant he was buried deep! But he had cupped his hand over his mouth and nose, preserving a small air space so he could breathe.
He waited, buried under the weight of the snow, and tried to relax. He had to trust in his partners, their training, his and their gear.
None of the participants had ever been in this situation before. Time elapsed from avalanche impact to rescue was about 10 minutes. Under the conditions, after 20 minutes he would have been dead.
(Buxton, 2007)
Question: After the 'who'; what saved Saul?
Instructional videos by Canadian Forest Rescue SEE SAFETY (http://www.fsavalanche.org/).
Design related material:
Source: Buxton, B. (2007) Sketching User Experiences: Getting the Design Right and the Right Design, San Francisco, Morgan Kaufmann. (Video examples for the book can be found at the publisher's companion site)
Bill's homepage (billbuxton.com)
Cray was a legend in computers and said...
Selected quotes:
From around 5' mark"So, let me tell you a little bit, a few of the problems, that ah, and the solutions that I see in building large computers.
First of all... I think that building large computers should be done with the fewest possible people.
One is perfect, but you can't quite work with one.
So.. the next best thing is about 12."
"The reason you need 12 is you kind of need one person from each of the disciplines that are necessary.
You need a mechanical engineer to build the box that it'll go in.
You need an electrical engineer to put the circuit together.
You need a little bit of logic... and programmer here and there
And you need a secretary of course.
But not very many."
From around 6' mark
[On the projects I've been involved in]
"the number of people involved has been pretty much constant.
... from a low of 25 to a high of 40.
[Small enough] that's a group where I can remember everybody's name, which I think is kind of important, but large enough enough so that we can in fact build large scientific computers."
...My current company has 25 people, it started 2 years ago, and I certainly wouldn't want any more, it's kind of crowded."
...Our current machine is far enough along that it's starting to run programs.
"A small group of people is kind of essential.
And ah, the extent to which I've been successful in building large machines I think that is one key thing.
From around 8' mark
"...and another key point, that's perhaps equally important is discipline.
If you work in a large corporation it's very hard to keep on one track for 4 or 5 years.
And 4 or 5 years is how long you need to keep on track to work on a project like that.
So continuity is, .. is another very very important thing.
And to develop the continuity I mean not only the scope of the organisation that's providing the money for you but also the continuity in the sense of people sticking around and finishing the job.
It's hard to design a computer if the person who designed it has left and has been replaced twice by somebody else."
So another characteristic, the people I'm working with today, my little elves, are all kind of old little elves, they've all been around since the early 50s or mid 50s.
...And that brings me to another important point that I think you'll appreciate and that hit me hard this year.
Because, we decided we were all getting too old and something should be done.
From around 9' mark
"...So we decided that we would hire 8 new people, fresh out of school, who didn't know a thing about computers.
They might know a little bit about electronics a little bit about physics maybe.
But ah, let's say three of them were college graduates, three of them from trade schools.
And we'd just sit 'em down and try to teach them about this huge complex computer that we were designing and see how far we'd get.
Well, the shocking thing was, it was only about three months, and they were doing so well at it, that they were telling me about my design and what was wrong with it.
And by golly they were right.
These new kids were, were finding flaws in my logic design that I wouldn't have found myself.
And yet they had no experience prior to a few months of contact.
And I guess one of the things was that they were so unimpressed.
They had no idea, really, that this was supposed to be a big powerful machine.
And they were so unimpressed, that of course, you know, that they thought this was what everybody did that graduated from school.
[laughter]
And with an attitude like that, it's amazing, I guess maybe we are building simple computers.
..."
Thursday, 22 September 2022
Reading an article and not sure how to write about it yourself?
- readings, precis, impact, application -
Prompting questions:
Prompting questions:
- What did I learn from reading this article?
- What was the intention of the authors?
- Who is the audience for the article?
- How could I use the article?
Readings are often difficult to understand or alternatively, to interpret and make sense of. I've often read a paper and said to myself "so what", "it's obvious", "what's the appeal of this stuff?" Sometimes I've been confused, overwhelmed with detail or just don't get the point. I've also read papers that have set off ideas, recalled past experiences, given an outlook that changes something I thought I knew well but now see in a different light.
Writing a precis of a paper turns the whole process back on itself somewhat; I go from being the reader of the paper to being a writer. Writing about a paper demands something of me, not just my impression of the paper and the information contained within, but how I felt about the ideas expressed, how I saw them applied, and reflected on their wider impact.
Written comments on a reading need to be succinct (if you go past a page then perhaps you should be writing a new paper?), and impact-full. Get to the point, don't just summarise, criticise! Refer to other works in a meaningful way (counter examples, supporting examples), and reflect on the bigger picture. If there are implications for practitioners and practice then state them, particularly if they are personal, affecting you.
When criticising a paper you should always attempt to be fair. Criticise it on its terms, not because it doesn't address certain areas that you think are more important; there may be good reasons for a paper's omissions: limited space, out of scope, irrelevance.
Finally, keep to the limits, wordcounts shouldn't be treated as "targets". If you can say less then say less; less is often more. It takes time to distill your comments and the result is often unexpected, but often in good ways.
Pointers
- Pick out some aspect of interest from the paper
- Comment on it (there are no wrong answers, it's just an opinion)
- Link it back to design processes.
- And consider linking your argument with pertinent external readings.
Try not go off on a tangent or indulge yourself in a flight of fancy. But if the paper sets off your creative side then explain your logic:
The following rubric (a protocol or procedure) on assessing a written work may also be useful...
Audience: Who is the reading directed at? Is a question formulated, is it interesting and clearly put? Did the author clearly explain the purpose of the article?
Structure: Are the thoughts/agruments connected? Is there a logic to the presentation of ideas? Is theory utilised? If so is it treated critically or uncritically (just applied)? Do the authors anticipate and respond to counter-arguments?
Style of evidence: Does the work offer conjecture and possibilities based on the literature? Does the work offer empirical matter? Are assumptions stated? Is a philosophical foundation indicated?
Validity: How is the work positioned such that we understand how to test the extent of its claims, justification, rigour.
Rhetoric: Is the article persuasive? Are the findings, discussion and conclusions convincing? Does the work present implications and impacts? Are there behavioural, managerial, organisational consequences?
Further reading (about reading...no irony in that is there?)
"The reading included a discussion of X which made me consider Y (not in the reading) because...".Relate it back to the course; to continue:
"...but both X & Y are pertinent to Z which we have seen is a fundamental to the work of analysis, design and development"
The following rubric (a protocol or procedure) on assessing a written work may also be useful...
Audience: Who is the reading directed at? Is a question formulated, is it interesting and clearly put? Did the author clearly explain the purpose of the article?
Structure: Are the thoughts/agruments connected? Is there a logic to the presentation of ideas? Is theory utilised? If so is it treated critically or uncritically (just applied)? Do the authors anticipate and respond to counter-arguments?
Style of evidence: Does the work offer conjecture and possibilities based on the literature? Does the work offer empirical matter? Are assumptions stated? Is a philosophical foundation indicated?
Validity: How is the work positioned such that we understand how to test the extent of its claims, justification, rigour.
Rhetoric: Is the article persuasive? Are the findings, discussion and conclusions convincing? Does the work present implications and impacts? Are there behavioural, managerial, organisational consequences?
Further reading (about reading...no irony in that is there?)
- R. Subramanyam. Art of reading a journal article: Methodically and effectively. Journal of Oral and Maxillofacial Pathology : JOMFP, 17(1):65–70, Jan-Apr 2013. (link)
- E. Pain. How to (seriously) read a scientific paper. Science, March 2016. Available online at http://www.sciencemag.org/careers/2016/03/how-seriously-read-scientific-paper (Accessed: 29 November 2017). (link)
- A. Ruben. How to read a scientific paper. Science, January 2016. Available online at http://www.sciencemag.org/careers/2016/01/how-read-scientific-paper (Accessed: 29 November 2017).
Wednesday, 14 September 2022
Podcast media - two ideas (music, cover art)
What is podcast cover art?
Podcast cover art is a direct descendent of the traditional record cover. Think of the printed cardboard sleeve that contained old vinyl records (aka phonograph record, gramophone record, disc record, long-playing record, or just 'record'). The LP record had a diameter of 12' so the sleeve it came in was a 12' square. Sleeves for singles were typically 7' square.
(e.g. Example_Instagram_Format_Post.pptx)
You will create a cover art image in PowerPoint or other graphic design application. The image must be:
- A SQUARE artwork of size (minimum) 1400 x 1400 pixels to (a maximum) of 3000 x 3000 pixels, 72 dpi that can be exported to JPEG or PNG file.
If third party media is used then you must identify the source (file, location etc), credit the creator and/or owner of the copyright, and ensure you in turn have a valid copyright license to use the media or derivatives.
What is intro/outro music?
An intro/outro is typically a 5 to 15 second audio segment (a cut) that acts as a musical punctuation for media. As creators ourselves we need to understand copyright, royalty, licences, and permissions. Especially as we publish our own work under a Creative Commons licence. Creative Commons enables use to licence - use and share all kinds of digital media legally.
You will search for and select one music media file (mp3) available under a CC licence or similar no-fee royalty free licence.
Further reading
Creative Commons licence - using and sharing media legally
Friday, 10 December 2021
The Sage Research Methods Map
Search/browse through the Sage Research Methods Map online at methods.sagepub.com/methods-map
(main focus is on cultural, sociological and organisational research)
Mapping works!
Q: You encounter a complex challenge or you need to work with an organisation but you get stuck on the question of where to start?
Well start with mapping, mapping works!
Consider applying these practical actionable approaches...
Tuesday, 7 December 2021
Fin Goulding reflecting on how we build the organisations that build software
This talk by Fin Goulding at FlowCon France 2019 has so many points of resonance with my own software practice: the value of being present with each other, allowing ourselves to be vulnerable, open to learning (by making mistakes), using Kanban, focus on process, work-in-progress, flow, and visualising everything.
Not to mention the waste of attention being devoted to meaningless strategic change. Oh! And by the way, your own organisations' leaders are struggling with understanding what strategy is too. They struggle with appearing to need to know it all. So, take the Agility fad with a hefty pinch of salt, particularly if it is being served up by consultants.
In fact I think he is reflecting on how we build the organisations that build software. And if we take the idea far enough, all organisations are a kind of software. There are other ways, more human and humane ways to organise ourselves.
For more see Fin Goulding | Enterprise Flow | https://enterpriseflow.io
Wednesday, 6 October 2021
A message from "The Internet Archive Team"
Do watch, approximately 2' duration.
"
25 years ago, the entire World Wide Web was only 2.5 terabytes in size. Most connections were dial-up, important records were stored on tape, and a young engineer named Brewster Kahle was working on a revolutionary project—a way to archive the growing Internet.
Filmed by Marc Weber for the Web History Project, this video showcases the Internet Archive’s very first web crawl in 1996. In 2001, the project was made accessible to the public through the Wayback Machine. Today, the Internet Archive is home to more than 588 billion web pages, as well as 28 million books and texts, 14 million audio items, and 580,000 software titles, making us one of the world’s largest digital libraries.
As the Internet Archive approaches our 25th anniversary, let’s take a look at the hardware and high hopes that drove the project from the very beginning—and hear from the man whose vision made it all possible.
"
The Wayback Machine - https://web.archive.org
Creative Commons licence - using and sharing media legally
As creators ourselves we need to understand copyright, royalty, licences, and permissions. Especially as we publish our own work under a Creative Commons licence.
https://creativecommons.org/share-your-work/
Audio media to use/reuse/adapt
Searching for CC licensed audio on
- Freesound is a community hub offering free audio, foley and original music, requiring only acknowledgement of the artist.
- An example of CC-BY music via search on FMA (Free Music Archive)
- An example of CC-BY music via search on YouTube (being careful to ensure that the licence is appropriate) e.g.
- An example of CC-BY music via search on SoundCloud (being careful to ensure that the licence is appropriate) e.g.
- Creative Commons Music by Jason Shaw on Audionautix.com
- ICONS8 Fuge has both paid and free music, multiple licence types.
- University of Wollongong has a Sound Library of royalty free audio and sound effects that you can use and also contribute to.
Broad visual media to use/reuse/adapt
Searching for CC licensed images on
- flickr, image/video hosting service
- unplash, a stock photography service
- pixabay, for stock photography, stock footage, stock vector graphics, stock music
Spaghetti cantilever experiments over time


ASE Guindon Exercise 2013
Guindon Exercise 2012
Wednesday, 15 September 2021
Editing mp3 files for a podcast
Audacity 3 (https://www.audacityteam.org)
Feel free to pick and choose from the general tips on editing mp3 files for a podcast below:
For sound engineering, I encourage you to record and post-edit your recording using the latest version of Audacity.
Post-editing a recording enables you to tidy things up. Cutting gaps, reducing the 'emms and ahhs', remove filler speech, background noises and any generally unnecessary audio. Audacity also lets you to record directly to the project if needed for voice over and bookend statements.
You can also post-process the recording to try to improve its quality; applying effects such as normalize (e.g. default values, typical -2.5dB) and compressor (default values), noise reduction, to fade in / fade out edits and eventually, and then ultimately, export the finished project to a new mp3 file.
 |
| A screen shot of an Audacity project |
The screenshot above illustrates what waveform levels might look like for your recording. Above all else trust your ears to judge the quality of a recording when you listen back to it.
Editing Audio for Podcasting with Audacity
Save Save Save - the Project file and folder
Everything lives in .aup3.
You are strongly advised NOT to save your active project to an external USB stick/disk, networked storage or cloud storage as it is unlikely to be fast enough for satisfactory recording and editing.
To avoid data loss save the project frequently. Make a local disk copy for project editing as Audacity generates very large sets of project edit/state files (online cloud drive services may not unpack or stage quickly enough to support Audacity's project edit/save cycle).
To share an Audacity project with others you will need to share the project aup3 file.
To share an Audacity project with others you will need to share the project aup3 file.
n.b. older versions of Audacity stored data in a project _data folder. If you move to Audacity 3 there will no longer be a _data folder for each project (yay).
And save save save save frequently.
And occasionally 'save' then 'close' the project window to force the project to compact safely.
Reopen and continue working.
Importing audio
Create a new project and save to disk.
File > Save Project > Save Project (cmd S)
Import previously recorded audio (an mp3 or wav file).
File > Import > Audio
Save
cmd S
Your Audacity project with at least one audio track will resemble the screen shot above.
You can play, pause and even record new audio to the current track.
The playhead is the vertical line displayed over the waveform. All tracks will play through the audio device unless muted or one is soloed. The keyboard space bar toggles the play/pause function from the current playhead.
Once you start importing audio (particularly high quality poly WAV recordings), the Audacity project file (as of version 3 this will be the *.aup3 file) can become very large very quickly (anywhere from 3 GB to 36 GB).
I'm not 100% sure how to keep project size manageable (up to 2 or 3 GB seems about right) but have been experimenting with setting the project quality preferences, changing the default sample format from 32-bit float to 16-bit. Audacity may still spend 10s of minutes compacting the project when you close or quit.

Quick select, cut and paste
 |
| The Audacity toolbars, click and drag to rearrange or float |
Choose the Selection Tool (F1) to edit your audio track directly. Click-drag to highlight parts of the audio waveform. Use the cursor to select the waveform to copy (cmd C), paste (cmd V), duplicate (cmd D) cut (cmd X) or delete (del, backspace or cmd K) along the timeline. The edit commands are also accessed via the menu.
Edit > etc.
Automatically suppress background and soft sounds like breathing
Use Label Sounds to automatically search for and label silence (Audacity manual)


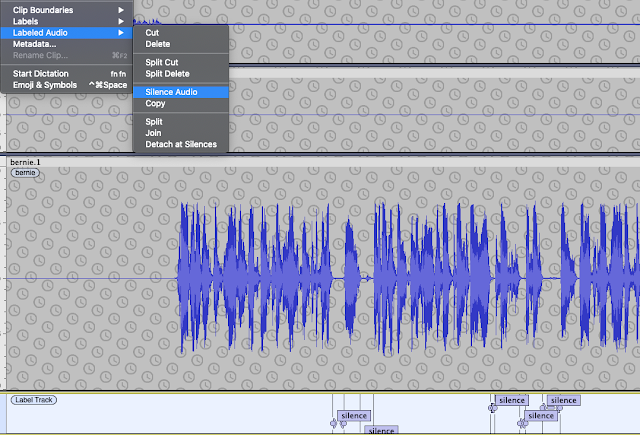 |
| Select Silence and suppress e.g. Silence Audio or manually e.g. Select and Normalize -35dB |
Using Tracks
Import a second audio file (for example, our intro/outro music).
Save the project (you should save frequently).
You will see at least two tracks in the current Audacity window.
Toggle the Sync-Lock Tracks setting if you want multiple tracks to overlay each other. This is useful if for example you want to overlap and slowly fade out an intro jingle.
Tracks > Sync-Lock Tracks (on/off)
You can organise the structure of a recording by using new tracks for sections of audio (to organise the large scale edit).
As of Audacity 3 you can now grab the track label bar when the hand icon/tool appears. This is a really handy :-) approach for aligning track segments or to move a split selection from one track to another.
Large scale edit
Your listeners want a well edited informative podcast so remember, less is more. You will have to listen (and re-listen) to your material and decide what to keep or delete. Think about the length and structure of the recording. You can change the order. You will delete stuff so do it. Concentrate on large chunks, the structure of the talk. Don’t worry about breathing, coughs and minor noises just yet.
Auto-Duck workflow...
Use noise-reduction on a scratch-track then auto-duck then auto-duck inverse in sequence to selectively reduce breath noise, background noise and artefacts on your working track (a good explanation video at this link).
1. duplicate the audio track to a new scratch track and apply noise reduction several times to the scratch track only...
2. create a new control track ABOVE the scratch track and generate a tone in this track: Sine, 120 Hz, 0.2 amplitude.
3. Auto Duck is applied "top to bottom". Select the track to be "Ducked" with the track below it having the "Auto Duck" pattern. Then apply Effect > Auto Duck (or Effect > Volume and Compression > Auto Duck), using the settings illustrated below...

4. Do this again but applying the new settings illustrated below...

Small scale edit
After the large scale edit more or less done, spend time on the small scale edit. This involves zooming in and fine-grained cut and pasting. But think before acting, is it really necessary to remove every single intake of breath?
For example: cut long gaps, background noises and any generally unnecessary audio. You might also cut some of the egregious 'emms and ahhs' and nervous filler speech we all use. A caution though, the small scale edit can become a journey without an end, or at least a very long journey.
Note: "Sometimes you will not want to close the gap and yet still remove the noise, for instance if somebody breathes loudly. For such occasions copy a section of audio during which nobody is speaking (e.g. at the start of the recording) and paste it over the unwanted noise. This will preserve the natural pacing of speech." (source: Cook & Holdis, CEU Podcast Library - link)
Fade-in Fade-out
Apply fade-in and fade-out when you want the speech to start or end smoothly.
 |
| A useful Audacity EQ setting |
Post-processing - Loudness Normalization
Start out by applying loudness normalization (default -23 LUFS) separately to each track - why separately? Each track has its own average. I think normalising across all tracks at the same time biases the average gain to the loudest track's level. The same thing happens with Normalize but you can use that to your advantage to selectively boost or reduce selected loud or quiet segments.
Post-processing - noise reduction (if needed)
Select a several second sample of just the noise you want to remove.
Post-processing - low pass / high pass and other ways to reduce echo?
What to do if the original recording has transient audio peaks (annoying clicks, chirps, squeaks etc)?
Different approaches available depending on the original capture...
...via EQ
Apply the low pass filter at as low a cut-off level as you can get away with e.g. 1,100 Hz, 12 dB roll-off
Then apply click removal (200/40)
...via EQ again
Another alternative is to apply the RIAA filter using the Filter Curve EQ effect. This shifts the vocal emphasis towards the bass without over-muffling the sound. Reducing the intensity of the higher frequencies allows the listener to focus on the mid-low vocal range and deemphasises the intensity of any annoying high-end audio reflection that gets captured so easily when using a condensor mic in a room without sound treatment.
Then EQ->Normalize->Compressor->Normalize (can repeat if needed) as follows...
1. Post-processing - Graphic EQ (equalization)
Base boost plust treble boost
2. Post-processing - Normalize
Apply default (-3dB) - the waveform will push over 0.5 but keep away from 1.0
3. Post-processing - Compressor (last)
Select -19 dB or choose a threshold between default -12dB down to as low as -30dB
Select noise floor, around -50dB
Select ratio 4.7:1 or vary, typical ratio, between 2:1 - 3:1 - 5:1
Drop attack time (0.2s) and release time (2.0s) to maximise compression applied
These settings end up boosting the volume (visually the waveform moves closer to 1.0) making it too loud and noisy so you'll need to normalize (or amplify) again...
4. Post-processing - Normalize (again)
Apply default (-3dB) or you can apply Amplify -3dB, for the same result.
The desired result being for the waveform peaks to re-balance back to around the 0.5 level.
Installing the De-Esser and De-Clicker Nyquist Plugins...
Apply De-Esser and De-Clicker if needed
Improving a Zoom track?
Loudness Normalization > AUMatrixReverb > ClipFix > Normalize 3 > Amplify 3
Apply Noise Reduction if a suitable noise sample is available
Overall, peak levels to be no more than 3dB
 |
| AUMatrixReverb settings may help to obscure small room reverb |
 |
| AUBandpass Filter |
Finish up
Export the mp3
Finally, create the finished product, by exporting to an mp3 file.
> File > Export > Export as MP3
This mixes all tracks in the Audacity project down to a single track.
Use settings similar to the following to export your audio file.


Quality checks:
- Is the intro/outro music at a suitable level?
- Does the intro/outro transition smoothly to/from the spoken audio?
- Is the spoken audio at a suitable level? (i.e. no clipping, waveform amplitude averages around 0.5 on linear scale)
- Is the speed of speech natural?
- Large scale edit - remove fumbled speech, removed confidential disclosures, cut out a duplicate or passages that were off topic, etc.
- Small scale edit - remove ticks, emms, ahhs, sighs, distracting background, etc.
- You wouldn't normally have backing music running throughout a podcast, but in some cases, for example, background room noises leaking into the audio, so you may decide to use low volume background as a filler/distractor.
Useful links
An Audacity tutorial on mixing a narration with background music
https://manual.audacityteam.org/man/tutorial_mixing_a_narration_with_background_music.html
https://manual.audacityteam.org/man/tutorial_mixing_a_narration_with_background_music.html
Refer to the Audacity manual online (e.g. the track panel description/explanation is at manual.audacityteam.org)
An Audacity user's simple tutorial and workflow activities:
Using the Compressor in Audacity
Using Noise Removal in Audacity
On including music from other artists (for atmosphere, decoratively, for intros/outros & transitions)
In the first instance, if you know the artist ask for their permission to use their material. You may be pleasantly surprised by the positive cycle of recognition and community surrounding artist works. Make sure you acknowledge them in your show notes.
We recommend releasing under the “Attribution-NonCommercial-ShareAlike version 4.0 creative commons licence (aka CC BY-NC-SA 4.0). You can choose from a number or variations of the CC licence; CC BY, CC BY-NC, CC SA etc.
These licences can be viewed at https://creativecommons.org/licenses/by-nc-sa/4.0
Always check the royalty free claims of audio samples found online. If you want to find audio from online sources, search for CC BY titles on Soundcloud or on YouTube
The link to the YouTube channel "Of Musicians" below is a collection of a selection of royalty free original music.
Record the following information in your show notes to establish the provenance and bona fides of 3rd party music, artwork and creative content that you decide to use:
Music (CC BY-NC-SA licence)
Title: “a title”Artist: “a name”Source: “a link to the original”Licence: “CC BY-NC-SA”
Cover Art (CC BY-NC-SA licence)
Title: “a title”Artist: “a name”Source: “a link to the original”Licence: “CC BY-NC-SA”
Example workflows:
Note, don't just apply these without testing. The basic method is to select a 10s sample and preview effects/filters until you are happy with the sound.
Simple standard process
Align tracks
Per-track noise reduction
Isolate voices
De-clicker (default) on all tracks (process run-time is typically the full track duration e.g. 15-30+ minutes)
De-esser (default) on all tracks (process run-time is a small fraction of the track duration)
Loudness Normalization (-23dB LUFS)
Compressor (default)
Makeup soft and suppress clipping on small edits with Normalize.
For an original track that had a pronounced small 'room' sound and a tendency to 'clipping zone' raw i.e. the waveform looks high, square and flat.
Align and isolate
De-clicker (default) on all tracks (process run-time is typically the full track duration e.g. 15-30+ minutes)
De-esser (default) on all tracks (process run-time is a small fraction of the track duration)
Loudness Normalization (-23dB LUFS)
Compressor (default)
Loudness Normalization (-23dB LUFS) (again)
Makeup soft and suppress clipping on small edits with Normalize.
AUMultiBandCompressor on affected track (the Sub Control preset sounded nice)
Normalize all audio to push up/down to average 0.5 waveform view (to give a typical -12dB to -6dB range with -3dB peaks)
For a track with clicks and speech that sounds very wet.
De-clicker (non-default 2 pass or more) on wet track.
Isolating second voice when two mics in the same room
Switch to Spectrogram view and select vocal patches with "Spectral edit multi tool" to fade-edit cross-talk.
AUMultiBandCompressor on affected track (the Sub Control preset sounds nice)
For a track with small room reverb and 'tinny' mic
Switch to Spectrogram view and select low frequencies 1-300Hz with "Spectral edit multi tool" to fade-edit.
Apply Filter Curve EQ - apply 100Hz Rumble filter to remove 'rumble pressure' from the audio (it feels like pressing on your ears when listening with headphones).
Apply Filter Curve EQ - apply Radio filter to remove the sensation of light 'highs' pressure when listening to the audio.
Guest Interviews
About Design Talk
The podcast is called "Design Talk (dot IE)". It is hosted on acast, and has its own website www.designtalk.ie. (Search for "Design Talk (dot IE)" via your usual player).
- The format is conversational, we like a lively gabfest style.
- Listen to episodes via
- a browser (https://www.designtalk.ie)
- Acast https://play.acast.com/s/design-talk
- Spotify https://spoti.fi/3sBxgk6
- or Apple Podcasts https://apple.co/3sIT4ug
- The podcast is recorded (not livestreamed) and post-edited before uploading
- The production team gives guests an opportunity to review the podcast before it is announced publicly
The podcast is recorded live, not prerecorded. We are very keen on balanced contributions from all participants. The moderator / host's role is to invite everyone to talk, to move the conversation along and gently redirect it if needed. The engagement person's role is to monitor the chat and other channels, working with the moderator / host to encourage, respond, drawing attention to comments etc.
To make for lively panel discussion, everyone should have something to say about everything, to share and discuss ideas.
We use show-notes. The show-notes act as a guide rather than a tight script, the show itself always takes its own course.
Avoid reading word-for-word scripted responses - unless you have amazing voice acting skills it is impossible to not to sound wooden. However the activity of preparing questions and statements readies the mind and enables you to engage nimbly with the flow of a discussion.
The Podcast Deliverables/Activities:
- Preparing, using the show-notes template.
- Prompting and responding to the audience.
- Hosting/recording the guest interview.
- After recording - editing the audio file using Audacity. Add intro and outro. Edit out gaps and errors.
- After recording - update the show-notes using the template.
- After recording - provide individual cover art by adapting the provided template.
- After recording - utilise social announcements (see the show-notes template)
What goes into the show-notes?
Think of the show-notes as something like the sleeve notes that accompanied LP records.The show-notes start out as a loose structure with reminders and prompts for the recording session.
But the show-notes are also used to capture and summarise all the relevant useful information in a concise format containing:
- The questions/observations that prompted your discussion with the guests
- The people involved and their roles
- The title/subtitle, episode #, season #, date of recording
- Kernel statements for the socials
- Information about the music elements used if any for intro/outro, backing and transitions
- Description and explanation for why you chose a particular artist and/or musical element, providing as much source information as possible but most importantly the correct licence and attribution
- Licence information for the intellectual properties
Note: the podcast publisher has editorial control and has final say on the finished production.
Seek inspiration and review previous episodes to understand the extent of detail and level of quality that is expected.
Is there a role for visual aids during a podcast? If you or your guests feel that visual props and different kinds of activity fit with the scope of your session then yes, you can use props like graphics, websites, slides and engagement tools such as surveys and whiteboards for interactive components.
However: as the finished product will be an mp3 file (an audio podcast) we expect that the visuals are merely aides for the talk, rather than substitutes. Your show-notes can be used to share links to online versions of visual elements, references to other material etc. If you have an essential diagram or picture, then please provide a description and explanation for the audience who won't be watching the video version. Some of the visual segments of the (i.e those without spoken descriptions) will not make it into the finished edited podcast version. For the final edited podcast, assume your audience is only able to listen to the audio file.
Podcasting - tips
The podcast will be live, not prerecorded. There will only be one take. We are very keen on balanced contributions from all participants. The moderator / host's role is to invite everyone to talk, to move the conversation along and gently redirect it if needed.
The podcast host act as chief questioner/host/producer/director/audio engineer, cook and bottle washer.
The guests role is to read any needed material in advance and collaborate with each other to make for lively panel discussion. Everyone should have something to say about everything. The panel concept is for a discussion of ideas not a presentation of the papers.
We provide a running order / show notes. The order of questions (and indicated responses) are merely a starting point. The show notes / running order is to be used as a guide rather than a tight script and the show itself should take its own course. The structure of the running order is intended to shape rather than control a panel discussion.
Usually there will be no need for guests to read aloud word-for-word scripted responses. However it is a good thing for guests to prepare in advance by writing out ideas, prepare bullet points or mind maps. If discussing a publication have a copy to hand with your own highlights or underlines. Regardless of whether we have a chance to read a prepared speech or not, the activity of preparing readies the mind and enables us to engage nimbly with the flow of a discussion.
 |
| The first class of AY 2020: Sep 22 MIS41020 in room E101 |
Tuesday, 3 August 2021
Product owners, managing the tension between control and flexibility
This open learning resource aims help you develop your own personal stance towards organising digital projects and managing the development process. There will always be a tension between what some perceive to be the rigorous approach to product management versus the flexible approach. The desire for control must be balanced against the need for flexibility.
There are various stances on product management, be it agile or project management or some other philosophy informs thinking. Working in the field you should reflection on the relative merits of various related industry attempts to 'scale and standardise' product management, in particular, systems for large teams doing distributed development, large scale deployment/operations.
- The AgileAlliance's certification services (https://www.scrumalliance.org/)
- The LeSS framework (Large-Scale Scrum https://less.works/)
- The SAFe framework (Scaled Agile Framework https://www.scaledagileframework.com/)
- The PRINCE2 framework (https://en.wikipedia.org/wiki/PRINCE2)
- The ISO9001:2015 Quality Management (https://www.nsai.ie/certification/management-systems/iso-9001-quality-management/)
- Oh, and of course, general project management.
Subscribe to:
Posts (Atom)